User activity tracking is a crucial component of any analytical work. Goals are actions that the user is expected to perform on the website. A consistent transition from one completed goal to another creates a sales funnel. Below is an example of a Google Analytics goal funnel.
Setting up goals allows you to see the conversion quickly, identify at what stage more users “drop away”, determine valuable traffic sources, evaluate the effectiveness of advertising campaigns, etc.
The process of goals setup is simple, but if your site is built using JS, and all forms and fields are on the same page without reloading and changing URLs, be prepared to face troubles. In this article, we will describe the process of setting up multi-step goals for single-page sites and applications using Google Analytics and Google Tag Manager.
What is a multi-step goal, and how does it differ from regular goals in analytics? Let us figure it out.
A regular goal is a single action a user performs on the site. That’s what the classic Google Analytics goal types are called (landing page, event, etc.).
A multi-step goal is a sequence of goals that a user must complete for his goal to be considered achieved. Google Analytics lets you set up a goal consisting of 20 consecutive steps.
Important! The sequence of goals must be precise and continuous - that is, the user must complete all the steps outlined in the multi-step goal.
So, we’ve learned what a multi-step goal is. Now let’s move to its most appealing aspect and find out what it allows you to do. Setting a multi-step goal is the Google Analytics goal funnel required step (see the GIF above) in creating a funnel that visually displays user activities on a website.
If each action that you want to track on the site has its personal URL (which means that after clicking the buttons or filling out the forms a user is taken to a separate page) - congratulations, you're in luck, and setting up a multi-step goal will take less time.
All you need to do is create a funnel that will lead the user towards their main goal (placing an order, leaving a request, etc.). It should look more or less like this:
|
Step1 — > Step2 — > Step3 — > Step “Our goal”
|
Please be reminded that Google Analytics allows you to add up to 20 consecutive steps.
You need to configure your goal event for each Step. To do this, you need to select the goal type (landing page) in the appropriate analytics view and indicate the destination goal (part of the URL that comes after the domain address) in the goal details.
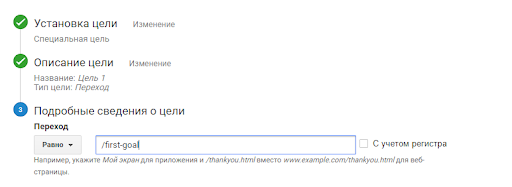
Having configured a goal for each Step, we then proceed to set up a multi-step goal. As we initially decided, this multi-step goal will be the Step called “Our goal”. In the same way, we create a goal leading to a target page, but activate the “Sequence” button and define each Step (goals that we’ve set up before). If the first Step is required, please toggle on the “Required” option.
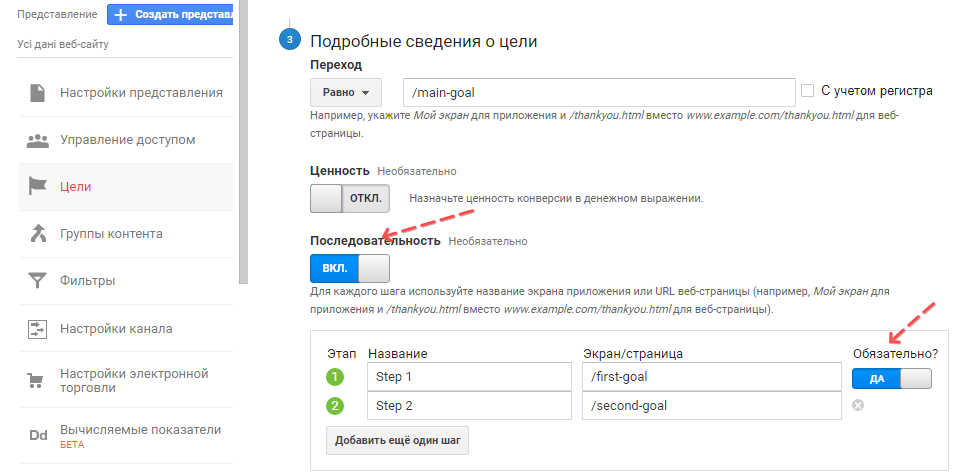
In such a way, you can easily set up goal tracking in Google Analytics. Let us now turn to the question of how to set up a multi-step goal for a one-page website/ application and pop-ups or button clicks tracking.
What if your project does not allow you to set up a multi-step goal in a simple way? There is a solution. Let us share our experience of using virtual pages.
A virtual page is a non-existent URL on a website that will be displayed in analytics when a user performs a specific action.
For example, while clicking on the “Buy” button, we remained at the same URL but received a new form to fill out.

In our case, Google Analytics was connected to the site via GTM (Google Tag Manager); therefore, a decision was made to transfer data on the completion of the actions to GTM by using Datalayer. At the stage of tracking the completed forms, it is essential to understand that in this case, we sometimes need to track clicks, and sometimes the processing of ajax requests (successful form completion).
For this purpose, we have added structures to the site code that transmit data to GTM:
dataLayer.push({'event': ‘event_name’})
"event_name" will be unique for each new event.
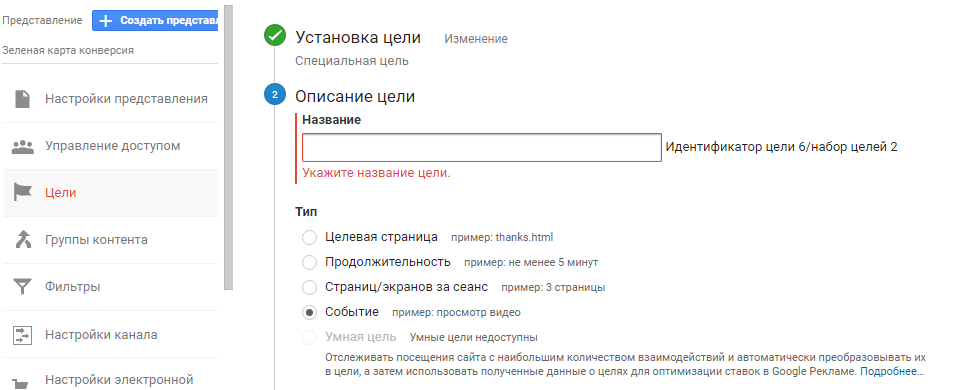
Important! When setting up goals, please mind that you do not always need to track button clicks. And if we speak about forms, we are interested in having them filled out successfully - this is what we consider an achieved goal.
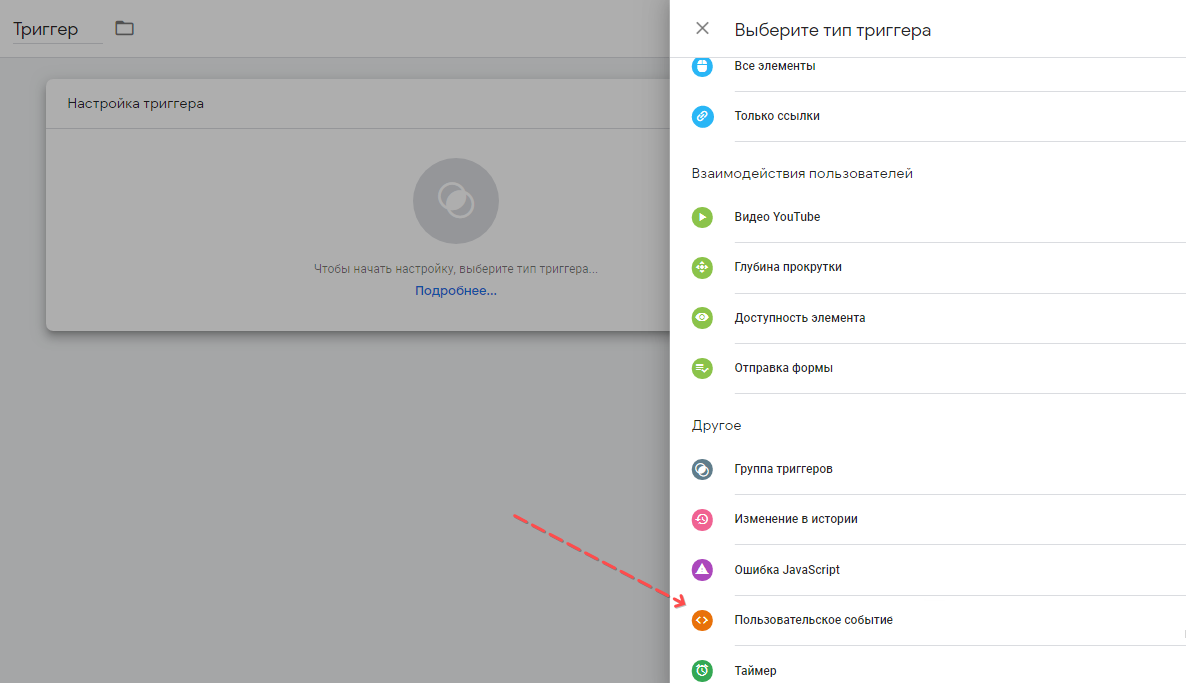
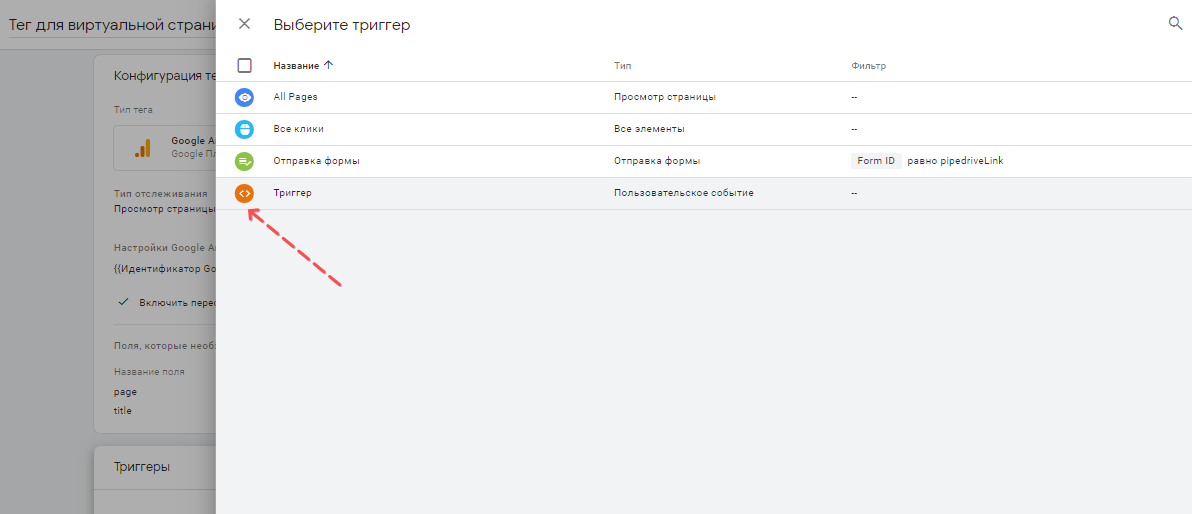
The next step is to create a GTM trigger. It will be activated when a user performs the action we’ve put dataLayer on. That’s why we selected the “Custom Event” type when creating the trigger.
We’ve inserted the selected part of the code in the “Event Name” field, which is the name of the event dataLayer.push ({'event': ‘event_name’}). You can replace “Event Name” with any text; the main thing is that it should coincide both in the site code and in the GTM trigger.
Now for this trigger, you need to create a tag that will be activated when an action is performed. We will create a virtual page in this tag.
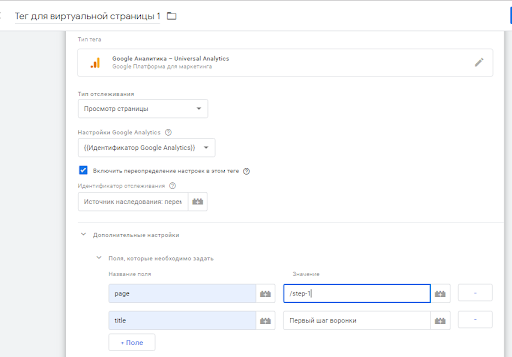
To create a new tag the way we did it, please follow steps below:
The first “Page" field corresponds to your virtual page, and the “Title” field corresponds to its name.
Then you need to select the trigger that will activate this tag. In our example, it is the trigger that we created earlier.
A virtual page for Google Analytics tracking is ready. You can use the “Preview” option in GTM to test the tag.

After clicking the “Preview” button, you open your website, and a window with the tags that were activated on this page appears at the page bottom. When goals are triggered, new tags will be added.

If everything works correctly, you can publish the GTM container and then go to Google Analytics and create tracking of landing pages, as it was described earlier in this article, choosing virtual URLs in the process.
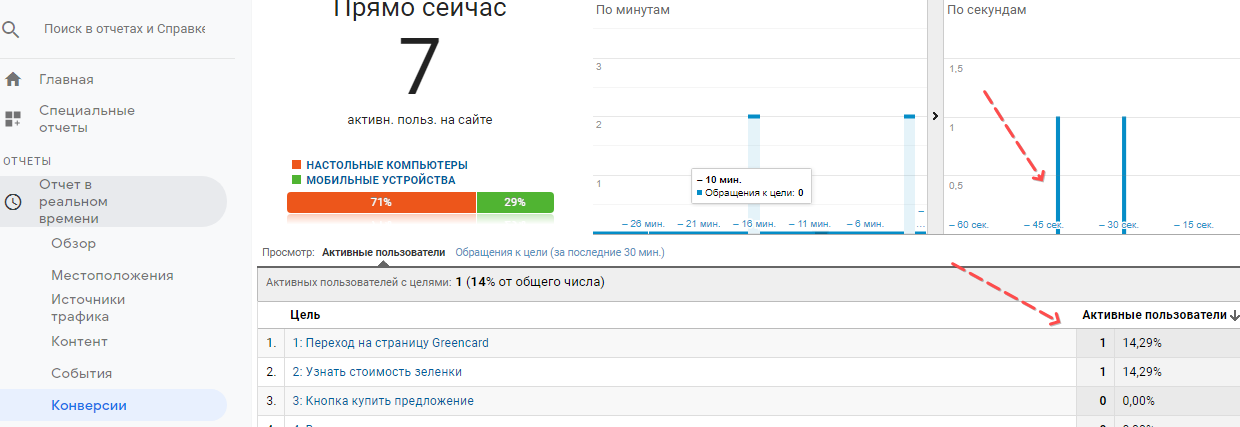
After creating goals in Google Analytics, we also recommend checking if they work correctly in the real-time Google Analytics Goal Flow report.
P.S. If you want to build several large funnels, you need to create different views for them in GA and folders (with tags and triggers) in GTM. In this case, navigating through the elements will be easier, and finding the desired tag/ trigger/ target will not be difficult.